Content Manager
This is the area you will need to be most familiar with. The “Content Management” section of the admin site allows you to add/modify/delete pages from the website. (See Figure 1.)
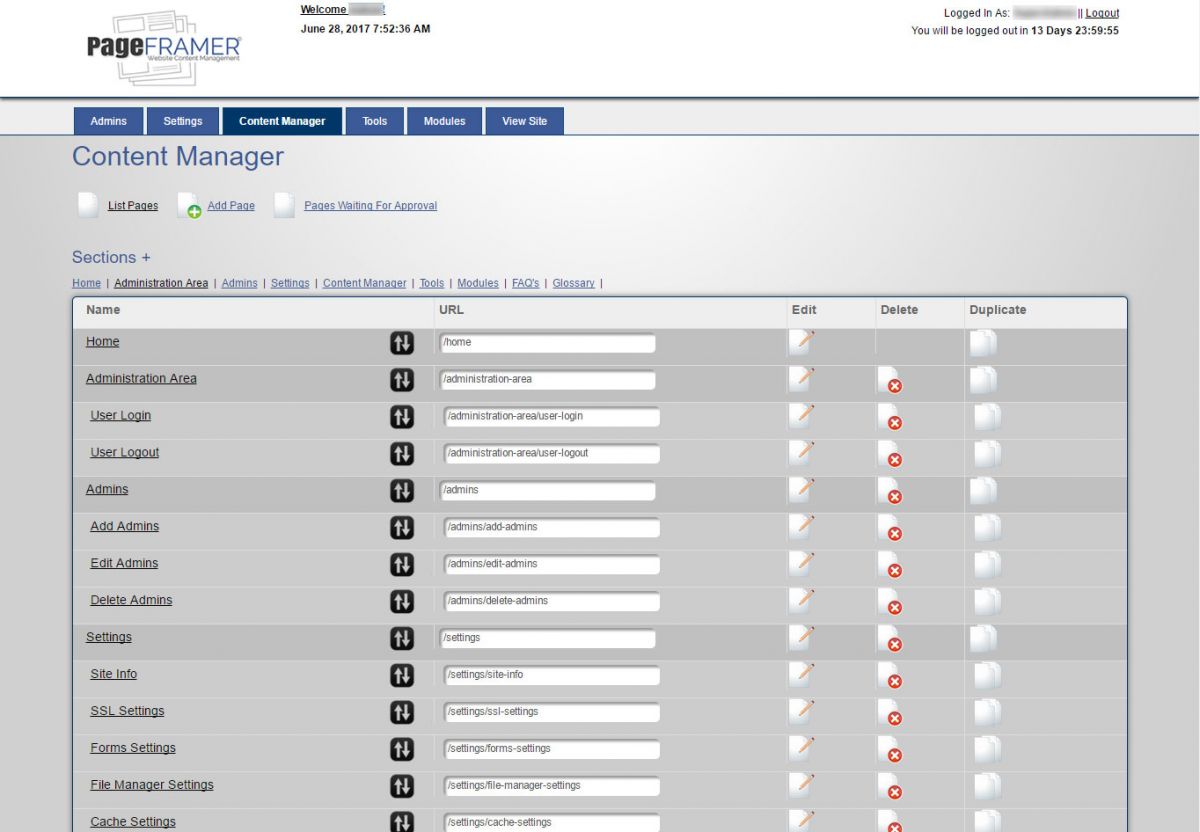
Figure 1
Note: It is not recommended to arbitrarily delete pages from the website unless you have no intention of using those pages ever again. The preferred method would be to deselect the "Publish" checkbox to hide the page. See the "Add Pages" section for more information on how to do this.
An important feature of the Content Manager screen is the Users ability to modify the order of pages using the drag and drop method (see Figure 2):
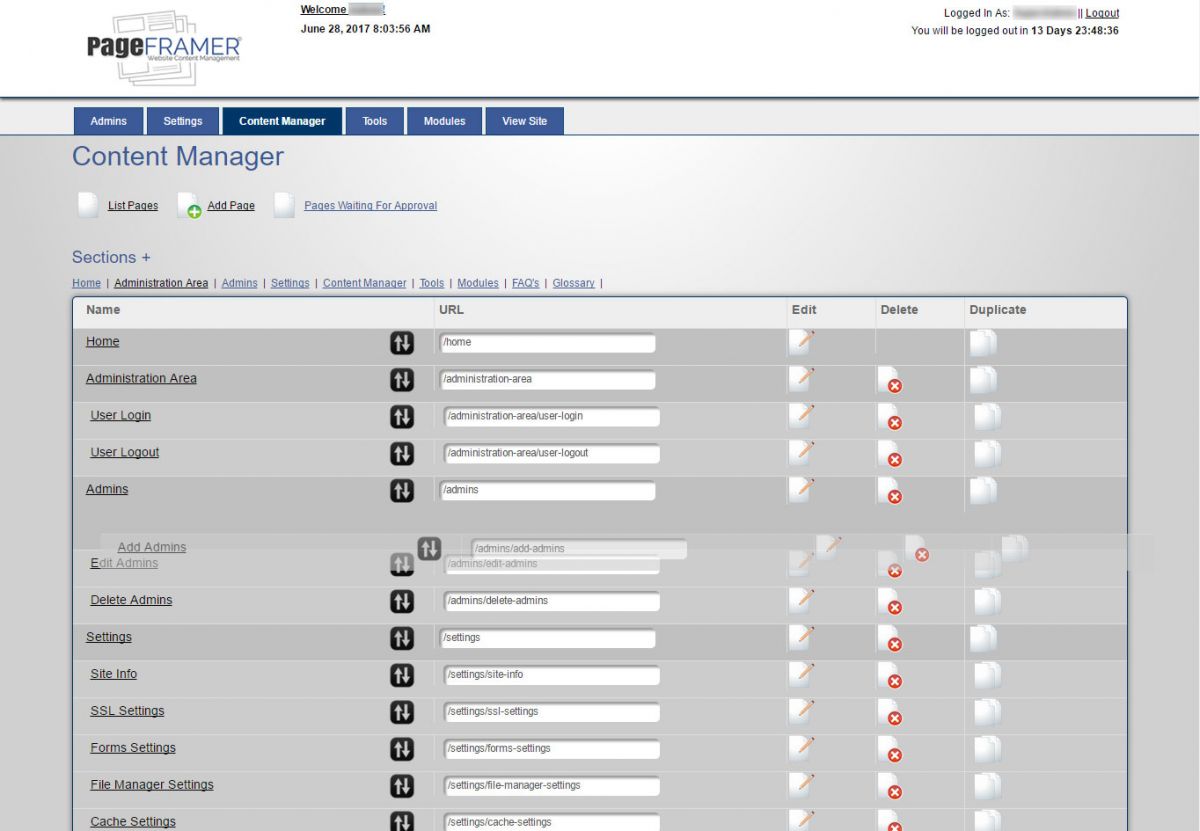
Figure 2
Note: While you can drag and drop pages that reside at the same level, you cannot use this function to move a child page to a parent page or a parent page to a child page. These changes must be performed in the page editor.
Add Page
To add a new page within the "Content Manager" select "Add Page" at the top of the Content Manager page (see Figure 3).

Figure 3
Once you have selected the "Add Page" you will be directed to Add Page editor page (see Figure 4). In pageframer 4.4.3, the page editor is seperated into 5 sections:
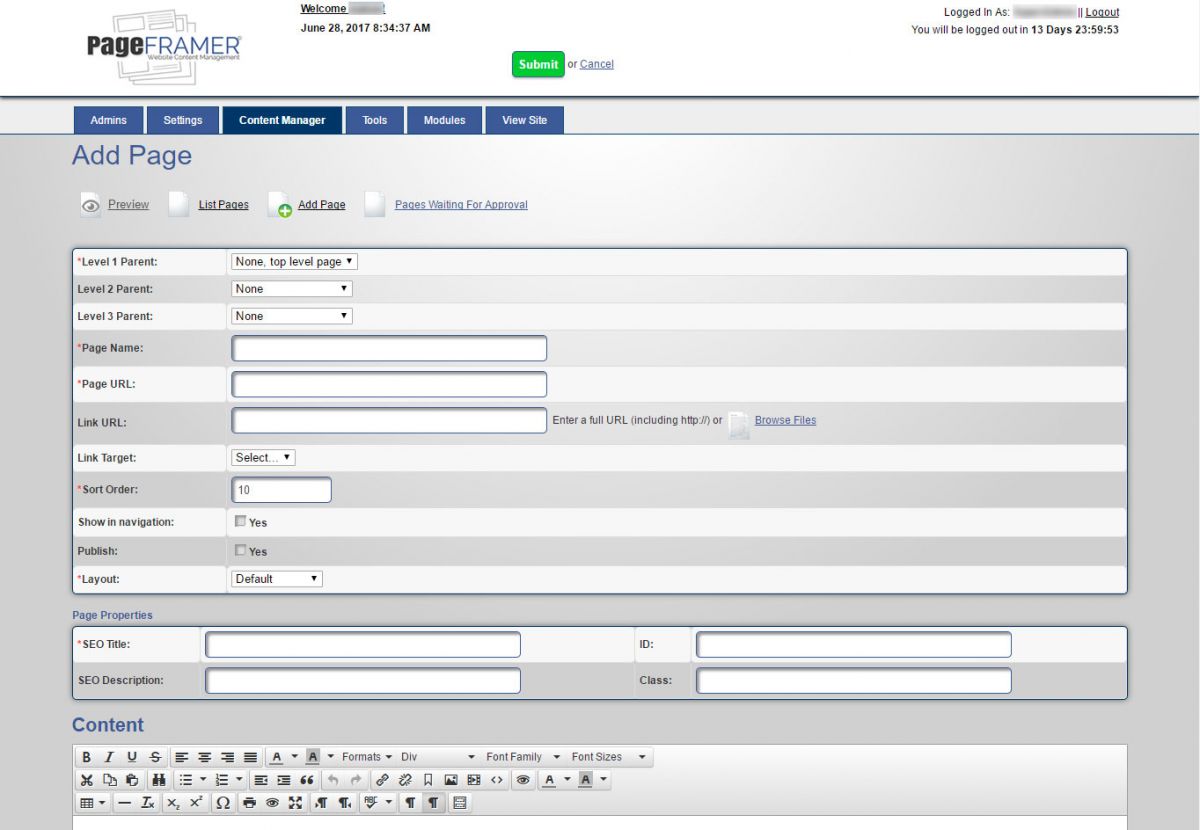
Figure 4
Top Section
The top section manages the page hierarchy in the navigation structure (unless the Navigation Builder Module is used instead of the built in navigation), the page identity, as well as the page template.
Level 1 Parent
The Level 1 Parent dropdown menu determines if the page is a top-level page or a child page under another top level parent page (see Figure 5). If the page is to remain a top level page in the main navigation then select the "None, top level page" setting. Otherwise, select the relevant parent page the new page will reside under.
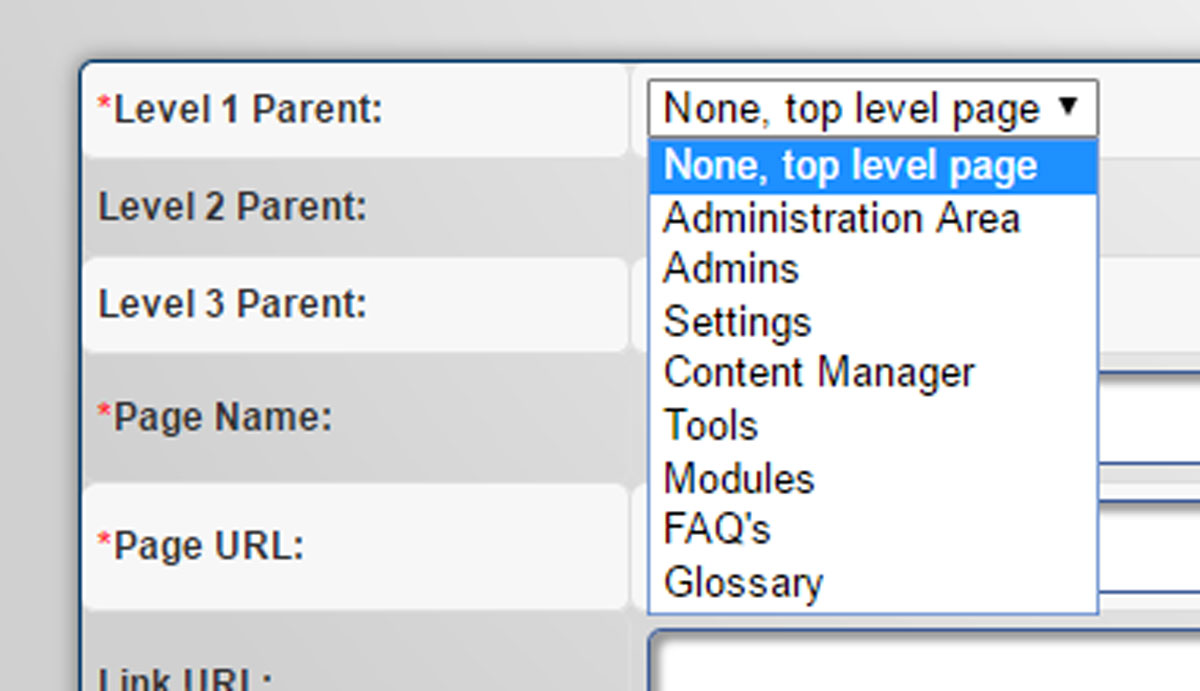
Figure 5
Warning: The navigation of the website may not have been designed to add 2nd or 3rd level child pages. If you add a child page under a parent page and it fails to appear within the navigation structure first, make certain that the "Show in Navigation" amd "Publish" checkboxes have been selected. If they have been selected and the submenu still does not appear, contact a PageFramer Developer and request sub-menus be added to your site's theme.
Level 2 Parent
If you want a page to be listed under a Level 2 parent page, you can select the page from the list of level 2 pages. This will make the page appear as a 3rd Level Page (see Figure 6).
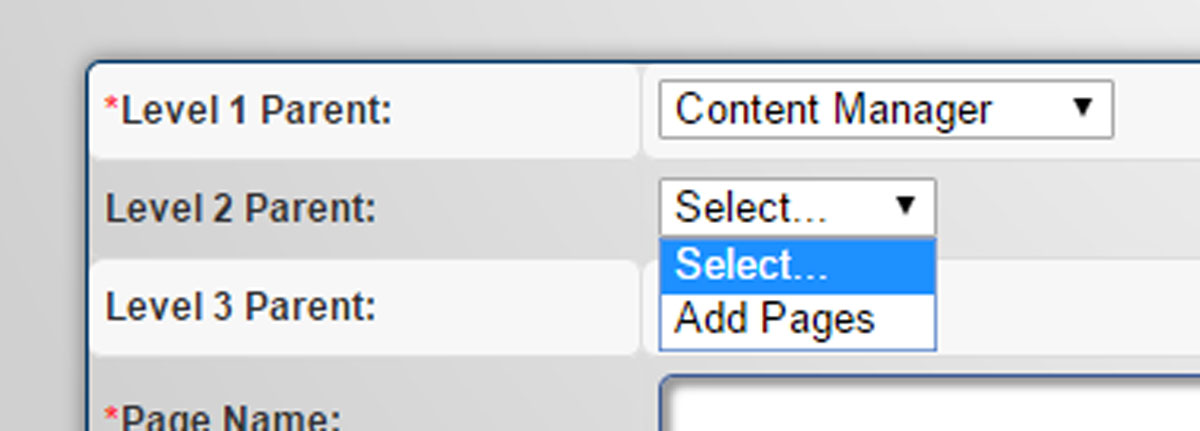
Figure 6
Level 3 Parent
If you want a page to be listed under a Level 3 parent page, you can select the page from the list of level 3 pages. This will make the page appear as a 4th Level Page (see Figure 7).

Figure 7
Note: Unless you have a website with hundreds of pages, it is usually not recommened to use more than 2 levels of navigation. In fact, if your website has hundreds of pages it would be best to use the Navigation Builder Module to create submenues inside of Level 1 or Level 2 pages. If you have questions about the navigation structure or are interested in learning more about the Navigation Builder Module, please contact the PageFramer System Administrators.
Page Name
The "Page Name" is one of the most important aspects of a page build (see Figure 8). Typically the Page Name is also the first Keyword Phrase used on the page. The Page Name is critical because it will also relate the to "Page URL" of your page.

Figure 8
Page URL
The "Page URL" is another important aspects of a page build (see Figure 9). The Page URL has a lot of weight in the score of search engine algorithms. In PageFramer, the Page URL is completed automatically when the Users types the "Page Name".

Figure 9
Note: The Page URL can be edited seperately from the Page Name. However, if you place your curser back into the Page Name field it will "reset" the Page URL. Also, Users should remove special characters (such as $ ' " & etc.) from the Page URL should they appear in the Page Name. You are not required to remove special characters from the Page URL, but they may make the Page URL more difficult to read by search engine robots and therefor may weigh negatively on your page's overal indexing score.
Link URL
The "Link URL" (see Figure 10) allows you to assign an external URL to a tab inside of the navigation structure or to link to a file within the website's "File Manager." If you choose tolink to a file from within the File Manager, select the "Browse Files" text link and a pop-over window for the File Manager will appear (see Figure 11). If you choose to link to an external website, simply copy the website URL into this section.

Figure 10
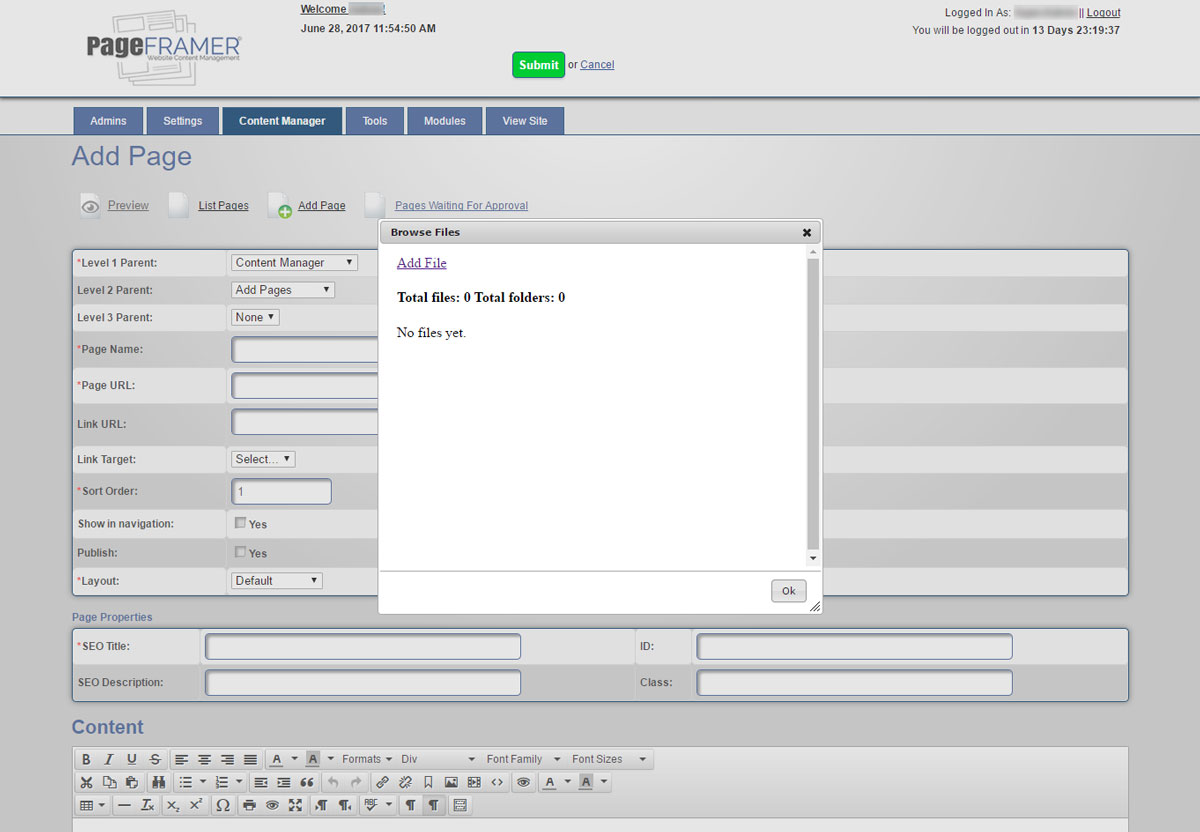
Figure 11
If a file has not already been uploaded to the File Manager, you may choose to upload a file by selecting the "Add File" text link. This will direct you to an "Add File" pop-over page (see Figure 12) where you can select the file from your computer. You can also drag-and-drop a file into a "Choose File" button. Once you have successfully added a file you will be directed back to the "Browse File" pop-over, where you can select a file from the list.
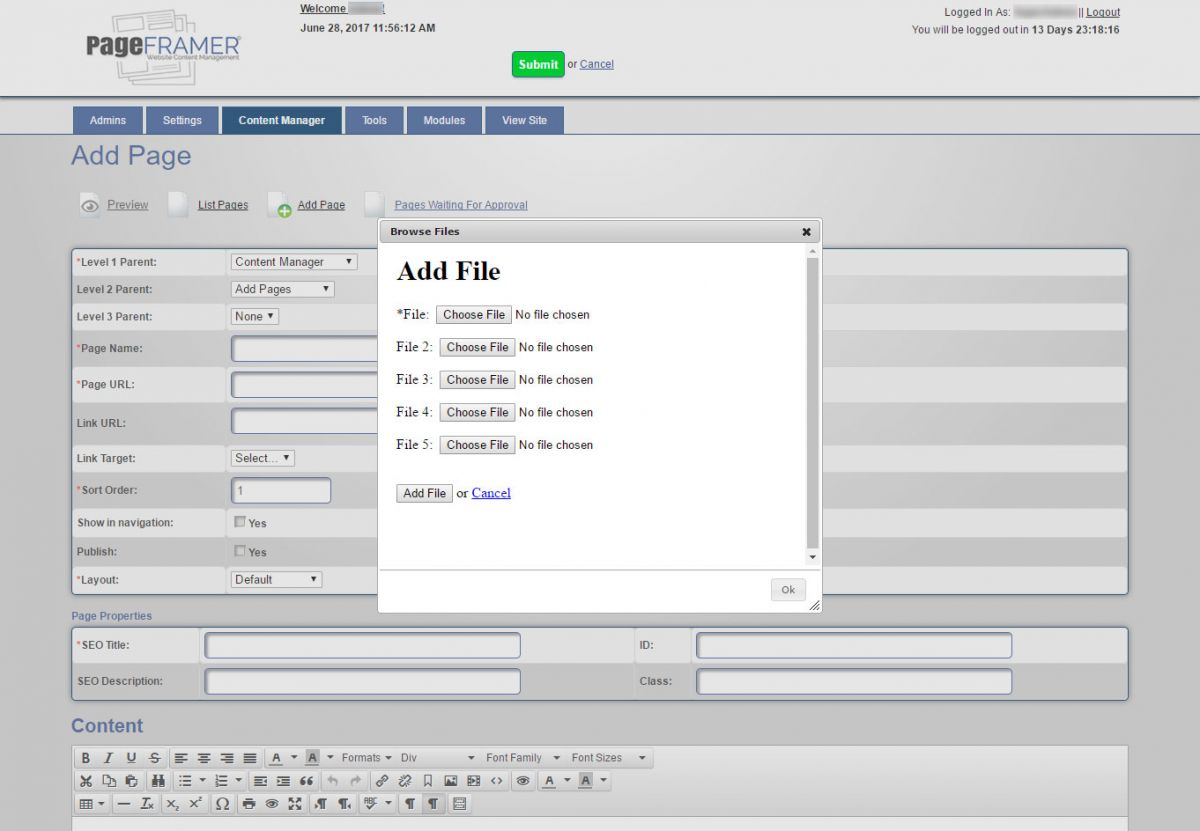
Figure 12
Note: You are restricted to uploading 5 files at a time using the pop-over "Add File" method. Also, you are typically restricted to 5MBs of total file size. Regardless, you should do your best to minimize files sizes whenever possible. If you have difficulty uploading a file by this method, chances are the file is too large and should be reduced in size
Link Target
The "Link Target" (see Figure 13) allows you to choose if the linked URL or file will appear in the same window or a new tab or window.
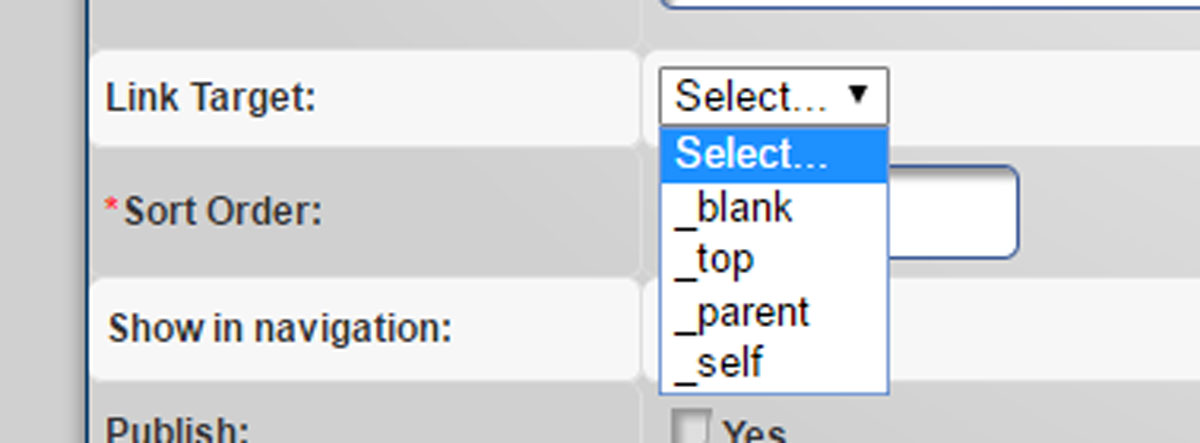
Figure 13
Note: While the editor allows you to choose from "_blank", "_top", "_parent", or "_self" you will typically not assign a "Link Target" or use the "_blank" link target.The "_blank" link target will open a URL or file in a new tab within a web browser. The remaining link target types are rarely ever used. To learn more about Link Targets, visit the Link Target Attribute page on the W3Schools.com website.
Sort Order
The "Sort Order" option (see Figure 14) allows you to assign a number to determine the order of the pages of the same level. For example, if you assign a Sort Order number of "1" the page will likely appear above other pages listed at the same level.

Figure 14
Note: Sort Order numbers do not auto-increment. Meaning it is possible to have mutiple pages with the same Sort Order number. However, if you sorts pages using the drag-and-drop function of the Contant Manager page the numbers will automatically be assigned and increment as needed.
Show In Navigation
The "Show in navigation" option (see Figure 15) is self-explanatory: if you want the page to appear within the navigation of the site this option must be selected. If this option is not selected, only people with a link to the page will be able to visit the page. You can use this as a way to proof your page before setting it live in the navigation. However, for the page to appear at all you will need to select the "Publish" option. (See below)

Figure 15
Publish
The "Publish" option (see Figure 16) is also self-explanatory: if you want the page to be visible to other Users or the general public you must select the Publish option. If you choose to "delete" a page of your website, rather than deleting the whole page, we recommend coming to this setting and un-clicking the Publish box. This way your page is no longer on the website, but you can still find it in the Content Manager should you ever decided to re-publish the page.

Figure 16
Note: Once a page has been published, even if that page does not appear within the Navigation because the "Show in navigation" option has not been selected, it is still possible that search engines can index the contents of the page. If the User does not want the page to be indexed the User should not select this option (i.e.: when a User creates a Test Page not intended for general viewing by the public or search engines).
Layout
The "Layout" option (see Figure 17) allows Users to select a pre-built template for the page. Templates govern high-level page layout. These pages may be customized by the PageFramer developers for individual sites. By default, the default template is, of course, "Default." The "Home" template is typically reserved for the Home page, while the "Column Right" page may be used for pages that have a right-side navigation. The "Modules" layout template is reserved for Modules (i.e.: the News Module or the Calendar Module).

Figure 17
Page Properties
Page Properties section contains the SEO Title, SEO Description, the page ID, and the page Class(es): (See Figure 18.)

Figure 18
SEO Title
The "SEO Title" is another important aspect of every page. This information is displayed in the page title of a search engine listing as well as the tab the page appears in within the web browsers. Typically the SEO Title contains SEO Keywords or Keyword Phrases. The optimal length of an SEO Title is 53-76 characters (including spaces). Longer SEO Titles may be cut off in search engines depending upon the device used for viewing the website. Longer SEO Titles are truncated and will have an ellipsis (...) appear at the end. Longer SEO Titles can be used, but they may give your website a negative weight by search engines. PageFramer only allows up to 255 characters. Regardless, 53 to 76 characters are highly recommended.
SEO Description
The "SEO Description" is another important aspect of every page. The SEO Description typically re-iterates the Keywords and/or Keyword Phrases used in the SEO Title. The recommended minimum number of characters (including spaces) is 121 characters. The maximum recommended is 153 characters (including spaces). Google truncates SEO description at about 153 characters. Also, the SEO Description may be truncated depending on the device used to view the site. So, we recommend SEO Descriptions to be 121-153 characters in length.
(Page) ID
The "ID" is a page ID that can be assigned to the overall page. This is useful if you are attempting to target a page using scripts or Cascading Style Sheets (CSS). A page ID can only be assigned once per page. A User cannot use the ID elsewhere within the page content. Most Users will not need to concern themselves with either the Page ID or Class(es).
(Page) Class
The "Class" is a page Class that can be assigned to the overall page. This is also useful if you are attempting to target a page using scripts or Cascading Style Sheets (CSS). Unlike the page ID, a page Class can be assigned to a page and to elements inside of the page code. Most Users will not need to concern themselves with either the Page ID or Class(es).
Warning: If a page already contains a page ID or page Class(es) DO NOT REMOVE THEM. These were placed there by the PageFramer Developers for a specific reason. Removal of either the page ID or page Class may cause the page to break.
Content
The "Content" (see Figure 19) is where the main content of the body of a page appears (excluding the page's Header or Footer content). For more information regarding the Content Section, refer to the Content Section subpage under the "Content Manager" tab in the navigation of this site.
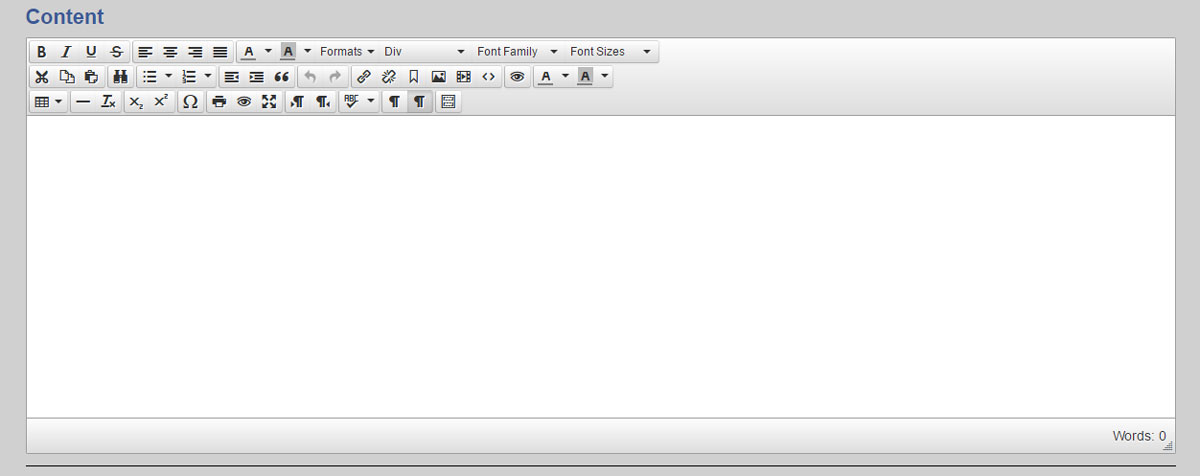
Figure 19
HTML Head
The "HTML Head" section (see Figure 20) allows you to add scripts and CSS into a page that are not required global elements of the website. This reduces the overall size of the website's main template pages and helps ensure the site pages load as efficiently as possible. In most cases, you will not need to use this section.

Figure 20
HTML Bottom
The "HTML Bottom" section (see Figure 21) is primarily used for individual page scripts. Once again, this help reduce the load time by restricting the scripts only to pages that require it.
Some scripts need to be placed into the bottom of the page so the rest of the content loads first. Both the HTML Head and HTML Bottom can be used to install social media widgets on individual pages. In most cases, you will not need to use this section.

Figure 21
To save changes once they have been made, select the "Submit" button located at the top of the PageFramer header or the "Submit" button at the bottom of the page, just above the page footer area. Once saved, you will be taken back to the "Content Manager" page. If you do not want to create a new page you can exit out of the Add Page screen by selecting the "Cancel" text link at the top or bottom of the page.
Edit Page
For the most part, modifying a page in PageFramer is exactly like adding a page in PageFramer. When you want to modify a page go to the "Content Manager" tab and select the page you wish to modify. You can enter into the "Edit Page" mode by either clicking on the name of the page in the Content Manager or by selecting the "edit" icon to the right of the Page Name and URL (See Figure 22).

Figure 22
Edit Page
Once the you have successfully navigated to the "Edit Page" screen, you will be able to make adjustments to all of the fields as described in the "Add Page" section under the "Content Manager" tab of this website. The primary difference between Add Page function and the Edit Page function is the ability to "Save and Exit" from the page or to "Save and Continue" to make further changes on the page as illustrated in Figure 23 and Figure 24 below: It is important to choose to either save or cancel your changes. If you simply close your browser window the next time you log in to the Content Manager, the page will appear to be locked. It will state who was last in the page, and at what time they left. This is to help prevent 2 users from attempting to update a page at the same time. If you see page has been locked for editing and you are certain no other users are currently editing the page, you may choose the "cancel edit" link to unlock the page.

Figure 23
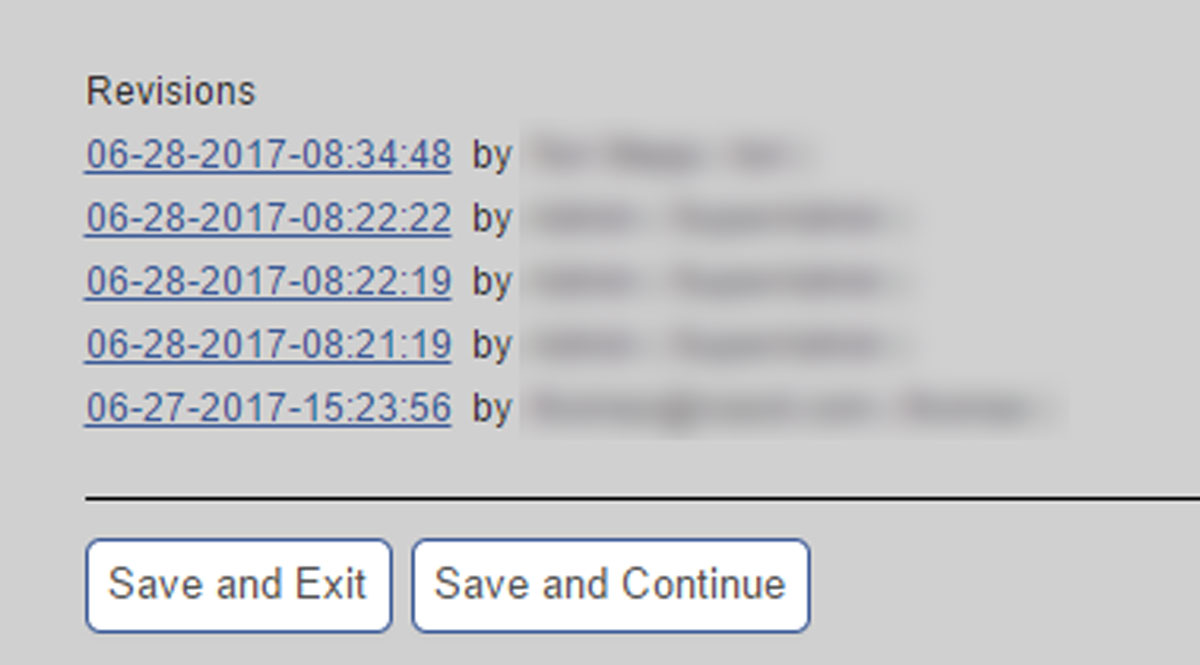
Figure 24
Page Revisions
As illustrated in Figure 24, PageFramer saves the last 5 iterations of your page. So, if you make a mistake and would like to recover a previous version of the website you can do so by selecting one of the 5 previously saved versions of the site to recover a page.
To save changes once they have been made, select the "Save and Exit" buttons at the top or the bottom of the page to save the edits and return to the "Content Manager" page. Otherwise, choose the "Save and Continue" button, in which case you will be returned to the page you just completed editing so you can continue to make further changes or updates.
If you do not want to edit a page, exit out of the Edit Page screen by selecting the "Cancel" text link at the top of the page, just below the header.
Delete Page
The process of deleteing a page framer is simple; click on the "Delete" icon to the right of the page as seen in Figure 25.

Figure 25
After you selected the page to be deleted you will be directed to the "Delete Page" screen (see Figure 26). This page will verify that you really intend to delete the page. If the you do intend to delete the page all you have to do is select the "Yes, Delete Page" button. Or you can select the "cancel" text link if you have selected the "Delete" icon by mistake. The User can choose to select the "Yes, Delete Page" button. Once this button has been selected, the User will go to a confirmation page (see Figure 27) stating the page has been succesffuly deleted from PageFramer.
Note: Once a page has been deleted it cannot be recovered from PageFramer. Prior to deleteing a page the User should determine if they really need to have the page deleted or if they can simply disable the page by de-selecting the "Show in navigation" and "Publish" check boxes.
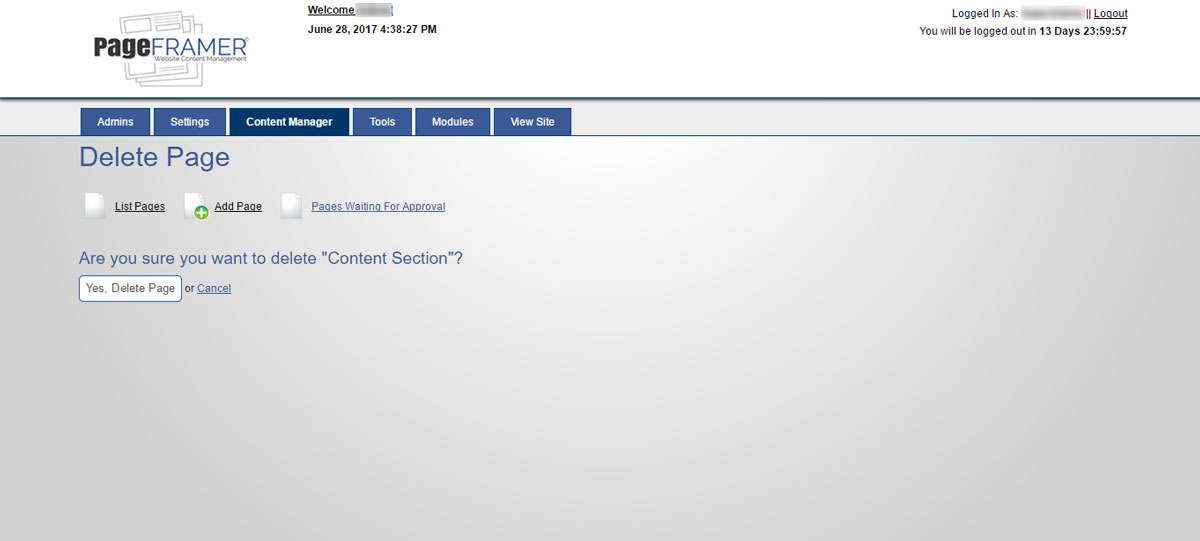 Figure 26

Figure 27
Once deleted, you will be taken back to the "Content Manager" page.
